This the complete debrief of a BARCAP mission for which I previously wrote part 1. If you already read part 1, please scroll down once you open this entry. Otherwise, enjoy!
My first mission on the squadron's ATO was a BARCAP, all the way on the east coast of Korea. Time over target was 0740 local time, with a planned time on station of 30 minutes. My sortie was a two ship sortie of F-16s block 40.
My wingman and I carried each 4 medium range AIM-120 AMRAAMs, 2 AIM-9L Sidewinders and 2 300 gallon drop tanks.
 |
| Climbing towards steerpoint 2. |
 |
| A pair of US bombers crossed paths with us. They were flying north ... I wonder what their target will be. |
 |
| This is war, gentlemen, and the airspace is supposed to be busy. The electronic warning receiver EWR displays all the plinks from friendly and hostile aircraft. We are still far from our CAP station, but keeping a close eye on the EWR is instinctive. |
 |
| Sorting out foes from friends was very involved. I kept locking my radar into assorted aircrafts heading north and asking AWACS if they were friendly or hostile. All of the aircraft heading north were friendly, I just wanted to be sure that none of these were enemy aircraft returning to their bases in North Korea. Some 15 miles east of steerpoint 3 (the west limit of our BARCAP station) I lock my radar onto an aircraft that is declared hostile by AWACs. Adrenaline jolt ... There is going to be a fight. |
 |
| The relative position of the enemy aircraft and the BARCAP station (triangle markers in the multifuncion display). |
 |
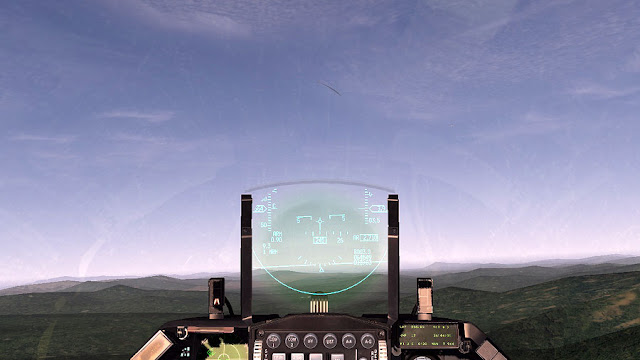
| The HUD view. The enemy aircraft is locked (square with a star icon) and I have two AIM-120s ready to be fired. |
The hostile aircraft in the other end of my radar beam was a MIG-23. The threat to my flight was not minor and we had to engage. The MIG-23s continued to turn towards us and although the RWR was silent, it was obvious that they were aware of our presence. The launch envelop of my AIM-120 shrinked and changed shape to something similar to a tiny kielbasa ... At 18 nm or so, still couldn't fire. There was a risk on flying towards the enemy like this. If this enemy flight was in a bombing/strike role, where were their escorts? Could be there an enemy ambush combat air patrol? But we are committed and we continue to fly into the enemy formation.
Finally, a total of four AIM-120s left the rails and flew into the entire enemy flight. It was very anticlimactic, lock, low-g maneuvering, missile launch and four splashes. The enemy sortie must have been a bombing run, judging by their relatively passive attitude.
When things go too easy, I get very nervous. We flew back to our BARCAP station with enemy territory at our backs, heads swiveling between the view over our shoulders and the RWR in the cockpit. So focused I became with the two views that the sudden appearance of a smoke trail at my 12 o'clock high almost gave me a heart attack.
 |
| What the hell is that? I hastily tried to switch to the helmet mounted cue system, but by the time I got it up and running, I was so close to this aircraft that I could see the USAF markings on it. What a relief! |
 |
| Another US bomber passing through our CAP station. I didn't see this in the ATO! |
Then all hell broke loose. We were warned by AWACS that a hostile flight of MIG-29s were headed towards us ... Damn, we were clueless. The enemy pilots turned on their radars just too close from us (some 20 miles or so. I turned and turned towards where they were supposed to be at and couldn't get a single blip. A few seconds later I have them on our 8 o'clock. More high-g turns and we are soon below angels 5. Bursts of AAA started to appear on our front.
What is this, fucking WWII-Bremen?
 |
| One or more MIG-29s in our left buttock and AAA in our arsehole. |
Thank God my wingman didn't keep SOP and was separated, above me with apparently a good positional advantage on the MIG-29s. I set him free to engage and he destroyed two MIG-29s with AIM-120s. I will never know if the enemy flight was a two or four ship, but the RWR went silent and we were still in the air.
I was low and slow and I wanted to re-gain some degree of tactical composure. I pointed my nose east towards the sea and I shaked the enemy AAA out of my threats list with a good dose of afterburner. My goal was to regain altitude and head back to the BARCAP station.
 |
| A convoy of armor near the place where we engaged the MIG-29s. Based on their heading, these are likely enemy troops. |
 |
| In the middle of a fuel-saving, slow climb The RWR came up with the symbol of a enemy SAM system. It was a SA-2 and I ignored it for a while until the missiles started to come towards us. In this screenshot, there is a SA-2 launch in the small port city on our left. |
Our altitude was relatively low (around 6,000 feet) and technically the SA-2 is not the weapon of choice for aircraft flying this low. But we took these launchers seriously.
 |
| Multiple SA-2 launches. One missile has just hit the ground (note the explosion) and other flew by (note the smoke trail). We were dodging the missiles, but the fuel consumption was high and we were unable to move out from the area as fast as we wanted to. |
 |
| My SAM evasion skills are rudimentary at best. In this case, I just flew towards the ground immediately after launch. The missile tried to follow me in lead pursuit and found the ground too early. The white smoke contrail is an SA-2. |
 |
| It took us too long to get out of the SA-2 battery area and we were bingo fuel. So bad was our fuel situation that we asked for an alternate airfield. In this screenshot, the SA-2 battery location is in the far background, between the mountain and the sea shore. |
 |
| Taxiing at the alternate airfield, alone with my thoughts about all the mistakes I made. |
 |
| The mission debrief. Not bad, but there were some serious mishaps during this mission. Please see below. |
Discussing what went wrong during the mission is something real fighter pilots always do. Hindsight is always 20/20. In that spirit:
- Locking into the MIG-23 and switching to other than RWS radar mod left me blind of possible escorts or other threats. I should have kept track of the enemy flight without a hard lock on them
- Spooked by the sudden appearance of MIG-29s, I started a series of turns in order to acquire them with the radar. These turns were made at way too high Gs and resulted in a loss of altitude that made the use of the radar even more difficult. I should have kept a cool head, use AWACS to update me and meet the threat with a better angle and altitude
- Ironically, the defeat of the enemy MIG-29s came out of a poor formation keeping. I was lucky that my wingman was so separated from my aircraft that the enemy didn't choose to engage him. I should have never separated from my wingman because the enemy could have engaged us one at a time
- Flying towards the coast after engaging the MIG-29s was a poor decision that resulted in an excessive risk and fuel consumption. I was trying to "reset" my flight's poor tactical situation (flying too low and apparently above enemy territory) and then fly back towards the BARCAP station at a higher altitude. I should have flown directly towards the BARCAP situation and I should have been aware of that SA-2 battery by taking more time in the briefing map
Cheers,


2 comments:
You got an excellent rating though! I'm still not proficient enough with the systems to risk campaign missions, but I'm enjoying your BMS AARS (and the new formats, okay...)
I enjoyed the action mate. you still got a flying bird after all. :)
Post a Comment